Unlimited flexibility with Custom Tools (Functions).
Transform how you interact with data and external tools effortlessly. Define custom functions within your model and integrate with over 2,000+ APIs in minutes.
Introduction
The advent of chatbots has revolutionized the way businesses and individuals interact with technology, offering a more intuitive and conversational interface to accomplish a myriad of tasks. Among the various features that enhance the capabilities of chatbots, function calling stands out as a pivotal integration, enabling chatbots to perform actions, access data, and interact with external systems beyond mere text generation and response. This documentation aims to delve into the intricacies of the function calling feature within chatbots, exploring its significance, benefits, and the foundational knowledge required to leverage this powerful feature effectively.
The Essence of Function Calling in Chatbots
Function calling in chatbots refers to the ability of a chatbot to execute predefined functions or interact with external APIs and services as part of its conversational flow. This capability transforms chatbots from simple question-and-answer tools into dynamic agents capable of performing tasks, retrieving real-time data, and providing personalized responses based on external inputs.
Importance of Function Calling
Integrating function calling into chatbots significantly enhances their utility and applicability across various domains. From fetching the latest weather updates to booking appointments or even controlling smart home devices, the possibilities are vast. This feature not only elevates the user experience but also opens up new avenues for automation, efficiency, and interaction in both personal and professional contexts.
Benefits of Function Calling
- Dynamic Interactions: Allows chatbots to offer real-time information and services, making interactions more engaging and relevant.
- Personalization: Enables tailored responses and actions based on the user's context, preferences, or history.
- Automation: Facilitates the automation of tasks and processes, reducing the need for manual intervention and streamlining operations.
- Enhanced Capabilities: Expands the role of chatbots from passive conversationalists to active assistants capable of executing tasks and providing solutions.
Getting Started
Enhancing your chatbot with function calling capabilities is an exciting step towards creating more interactive and useful applications. Remarkably, this advanced functionality doesn't require any programming experience. This section is designed to guide you through the initial setup, emphasizing the ease with which you can integrate function calling into your chatbot, using Pipedream as the backbone service for executing these functions.
Prerequisites
Before you embark on this journey, there are a few prerequisites you'll need to prepare:
-
Pipedream Account: Pipedream will act as the intermediary service that connects your chatbot to various APIs and external systems. It simplifies the process of making API calls and handling responses, allowing you to focus on designing your chatbot's interactions. You can sign up for a free or paid Pipedream account, depending on your needs. Visit Pipedream to create your account.
-
Familiarity with Your Chatbot's GUI: While you don't need to be a programmer, having a basic understanding of how to navigate and use your chatbot's GUI is essential. Botgenuity platform is designed to be user-friendly, so a bit of exploration should help you get comfortable with configuring your chatbot's settings.
Define Custom Function Schemas Through Your Chatbot's GUI

Creating custom function schemas within your chatbot's graphical user interface (GUI) allows you to extend the capabilities of your chatbot significantly. These schemas act as blueprints for the actions your chatbot can take, enabling it to call external functions, such as those hosted on Pipedream, based on user interactions. To facilitate a seamless experience, each schema comprises several fields that detail the function's name, purpose, execution endpoint, and the parameters it accepts. Here's a breakdown of how to define these schemas:
Function Name [Required]
- Description: This is the identifier for the function you're creating. Choose a name that is concise yet descriptive enough to indicate the function's purpose.
- Example:
getWeatherInfo
Function Description [Required]
- Description: Provide a clear and detailed explanation of what the function does. This description aids the chatbot model in understanding when and how to appropriately call the function.
- Example: "Retrieves the current weather information for a specified location."
Function Endpoint [Required]
- Description: This is the URL of the Pipedream workflow that will handle the actual API calls or interactions with external systems. The endpoint acts as the bridge between your chatbot and the function's execution environment.
- Example:
https://eo2p8f5lh08s7z2.m.pipedream.net
Parameters
Defining parameters allows you to customize the data sent to your function, making it versatile and adaptable to various use cases. Each parameter you define should include the following fields:
Name [Required]
- Description: The name of the parameter. This should be unique within the function schema and descriptive of the data it represents.
- Example:
location
Description [Required]
- Description: A brief explanation of the parameter's role or the data it holds. This helps in understanding how the parameter affects the function's behavior.
- Example: "The name of the city or location for which to retrieve weather information."
Type [Required]
- Description: Specifies the data type of the parameter. This is crucial for ensuring that the data provided to the function is in the correct format.
- Options:
string,number,boolean - Example:
string
Required [Checkbox]
- Description: A boolean flag indicating whether the parameter is mandatory for the function's execution. This helps in validating user input and ensuring that the function receives all necessary data.
By meticulously defining these fields for each custom function schema through your chatbot's GUI, you empower your chatbot to perform a wide array of tasks dynamically. Whether it's fetching data, performing calculations, or interacting with external services, these schemas lay the groundwork for a more interactive and helpful chatbot experience. Remember, the clarity and accuracy of your schema definitions directly impact the effectiveness and reliability of the function calling feature within your chatbot.
Set Up Pipedream to Handle Function Calls
Pipedream serves as a powerful platform that bridges your chatbot with a myriad of APIs and external systems, enabling you to extend the functionality of your chatbot through custom function calls. Setting up Pipedream to handle these calls involves creating workflows that correspond to the custom function schemas defined in your chatbot's GUI. This section guides you through the process of configuring Pipedream to seamlessly integrate with your chatbot, ensuring that your custom functions are executed efficiently and reliably.
Step 1: Create a Pipedream Account
If you haven't already, the first step is to sign up for a Pipedream account. You can choose between the free and paid plans based on your project's requirements. Visit the Pipedream website to create your account.
Step 2: Explore the Pipedream Interface
After signing up, take some time to familiarize yourself with the Pipedream dashboard. Here, you'll find options to create workflows, explore pre-built components, and manage your account settings.
Step 3: Create a New Workflow
Each custom function defined in your chatbot will correspond to a workflow in Pipedream. To create a new workflow:
- Navigate to the Workflows section of your Pipedream dashboard and click on the "New Workflow" button.
- Give your workflow a name that matches the function name defined in your chatbot's GUI for consistency and easier management.
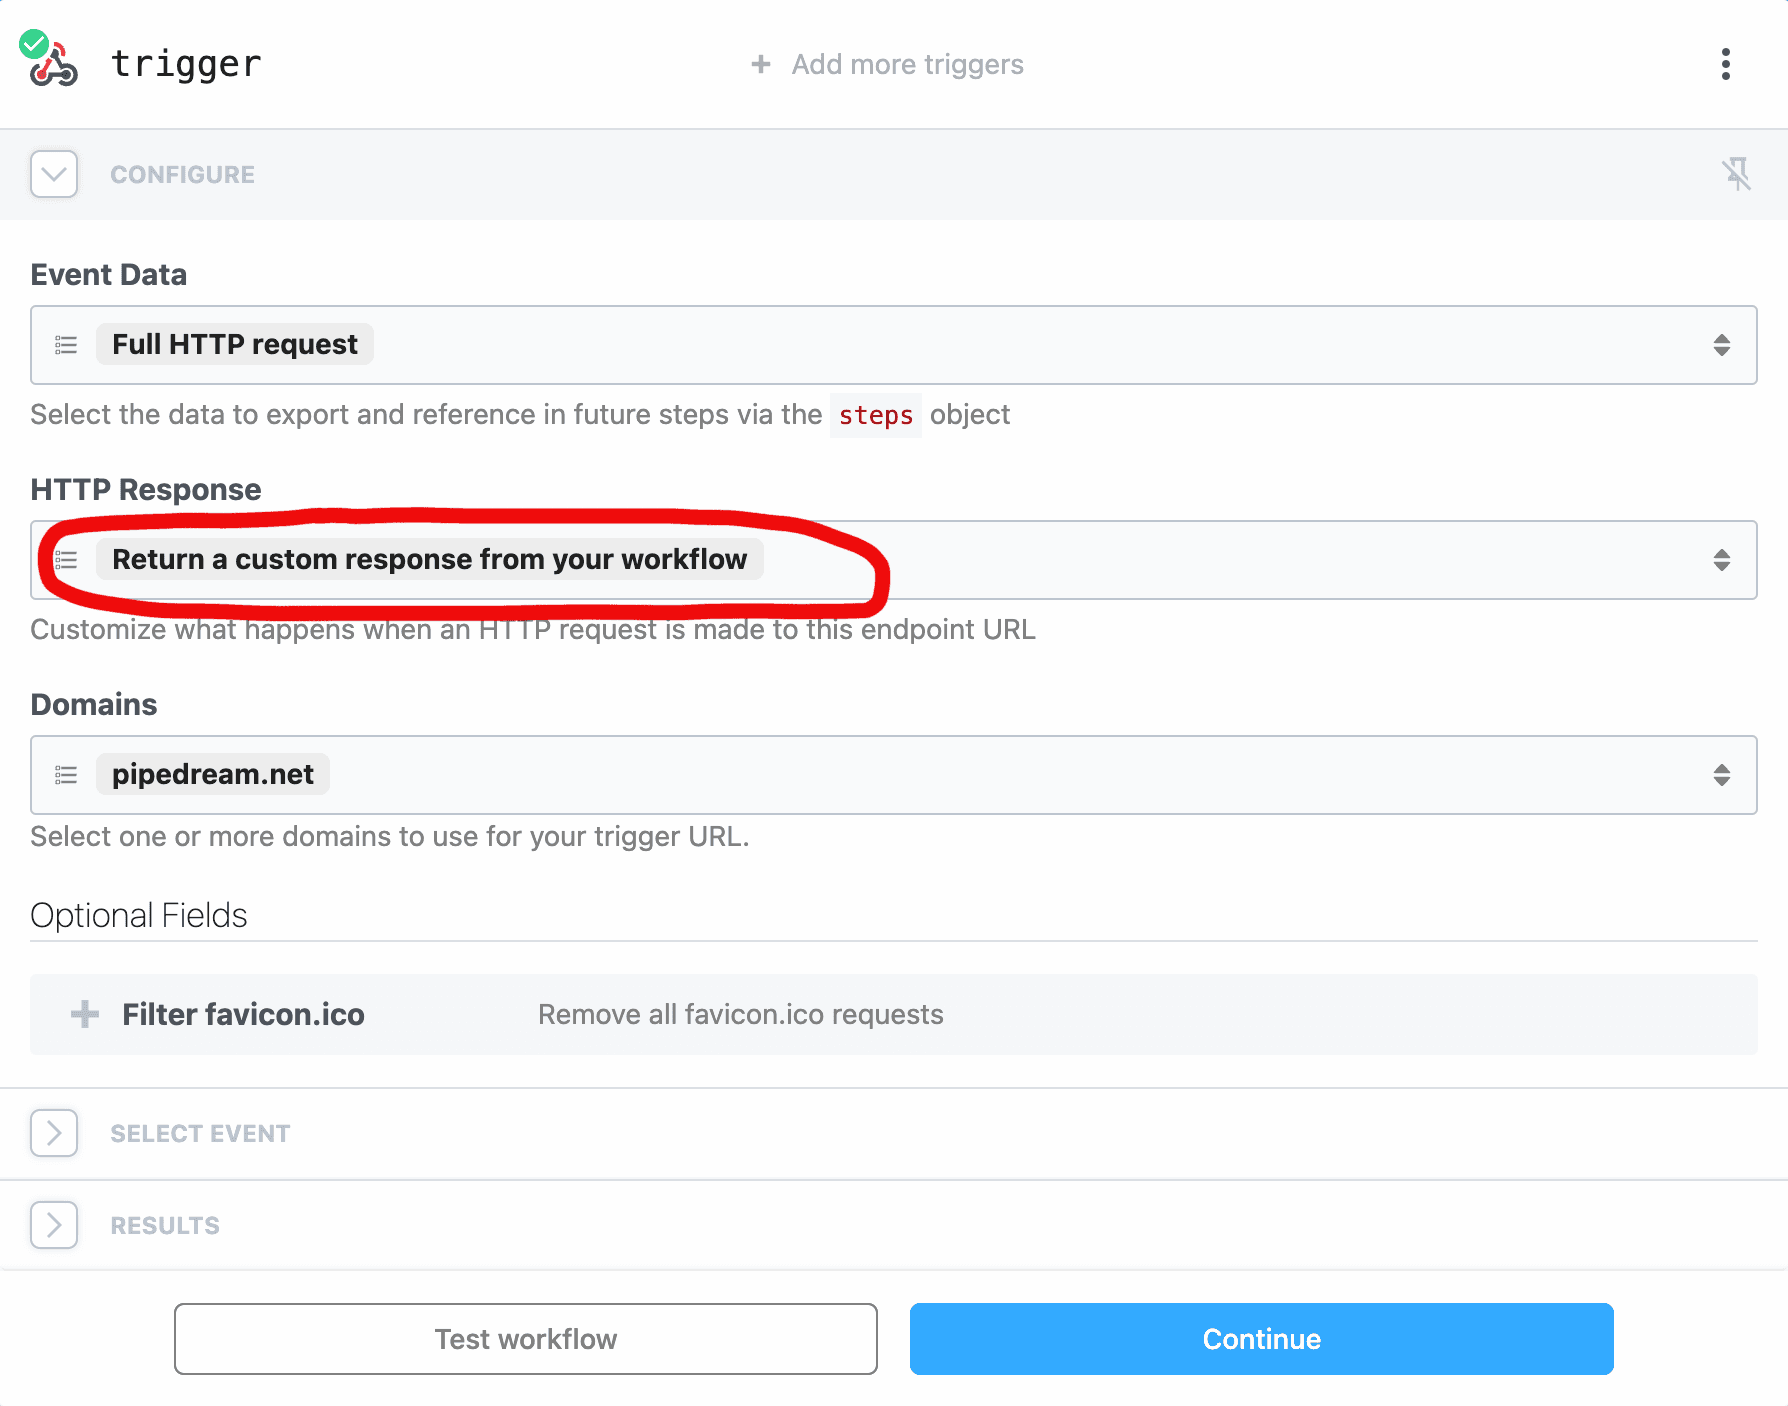
- Select a trigger for your workflow. Since these workflows will be triggered by your chatbot, you can choose the "HTTP / Webhook" trigger, which allows the workflow to be activated through a URL endpoint.
- Make sure that "HTTP Response" field is set to "Return a custom response from your workflow". This step is crucial as it configures your workflow to send back a response to your chatbot's custom function call. It ensures that the outcome of the workflow's actions, whether it's data retrieval, computation, or any other operation, is returned to your chatbot, allowing for dynamic and interactive user experiences.
Step 4: Configure the Workflow Actions
Within the workflow editor, you'll define the steps that correspond to the function calls from your chatbot:
- Add Step: Click on the "Add Step" button (+) to search for and select the appropriate action or component that matches the functionality of your custom function. Pipedream offers a wide range of integrated services and actions, from making HTTP requests to processing data.
- Configure the Step: Fill in the necessary fields, such as API endpoints, method (GET, POST, etc.), headers, and body. Use the parameters defined in your chatbot's custom function schema to dynamically insert data into your requests.
Step 5: Create an "HTTP Response" Step
After configuring the action that performs the core function:
-
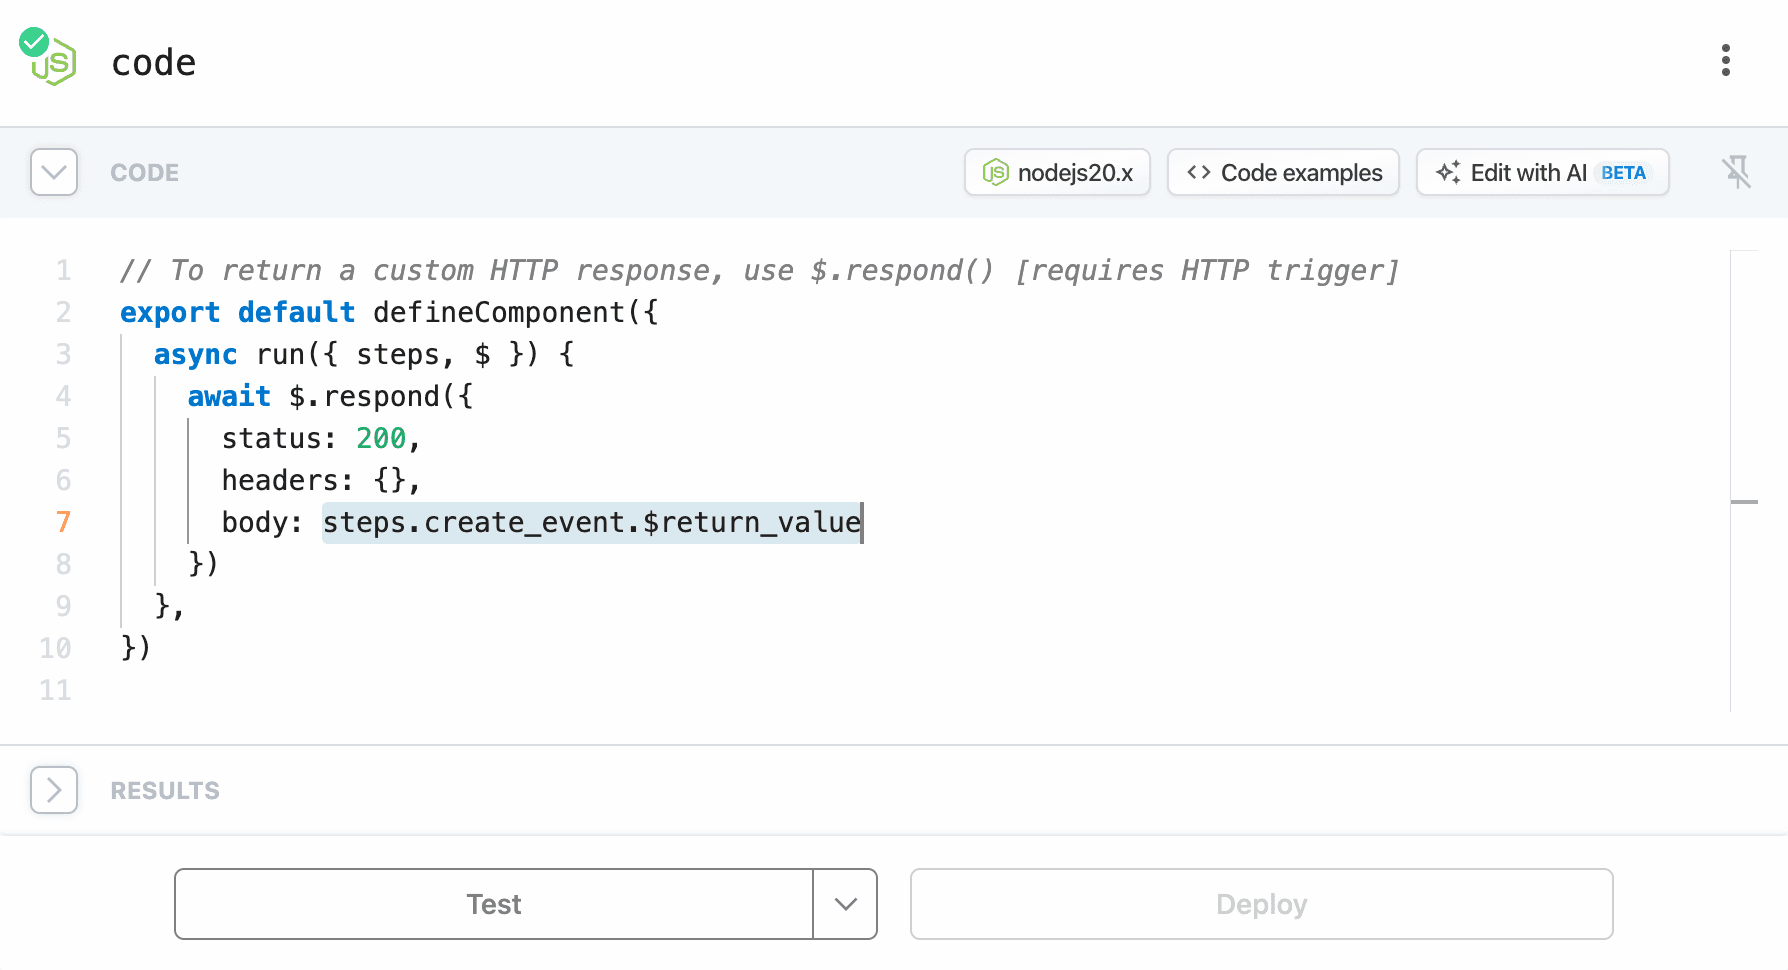
Add an 'HTTP Response' Step: To ensure your chatbot receives a response from the workflow, add an "HTTP Response" action. This can be found in the actions list or by searching for "HTTP Response."
-
Configure the Response: In the "HTTP Response" step's settings:
- Set the
bodyfield tosteps.{previous_action_name}.$return_value. Replace{previous_action_name}with the actual name of the step that performed the core action. This expression tells Pipedream to return the result of the previous action as the response body to your chatbot. - Configure any additional response parameters as needed, such as setting the correct content type in the headers.
- Set the
-
Test and Deploy: Before deploying, test the workflow to ensure the "HTTP Response" step correctly returns the expected output. Use the testing features provided by Pipedream to simulate requests and verify the responses. Once satisfied, deploy your workflow.
Step 6: Deploy and Test the Workflow
Once your workflow's actions are configured:
- Deploy the Workflow: Save and deploy your workflow. Pipedream will then provide you with a unique URL endpoint for the workflow.
- Test the Workflow: Use the provided URL to test the workflow from your chatbot. Ensure that the function is called correctly and that the expected actions are performed. You can monitor the execution logs in Pipedream for debugging and troubleshooting.
Integrate with Your Chatbot
Finally, link your Pipedream workflow to your chatbot:
- Copy the Workflow Endpoint URL: From your Pipedream dashboard, copy the unique URL endpoint provided for your deployed workflow.
- Set the Function Endpoint in Your Chatbot: In your chatbot's GUI, where you defined the custom function schema, enter the copied URL as the "Function Endpoint" for the corresponding function.
After successfully linking your Pipedream workflow with your chatbot and setting the function endpoint, a critical component to ensuring effective use of your custom functions lies in how you communicate the chatbot's capabilities to the LLM through your prompts. This step is vital for enabling the chatbot to autonomously recognize when to utilize the custom functions based on user interactions.
Importance of Crafting Effective Prompts
Effective prompts are crucial for guiding the LLM in your chatbot to apply the custom functions appropriately without needing to explicitly mention the function names in the conversation. A well-crafted prompt informs the LLM of the chatbot's role and the types of tasks it should be able to perform, leveraging the descriptions of the custom functions to make intelligent decisions on when to invoke them.
How to Craft an Effective Prompt
-
Contextual Understanding: The prompt should provide a clear understanding of the chatbot's purpose and the kinds of requests it can handle. This doesn't involve naming the functions but rather describing the chatbot's capabilities in a way that the LLM can infer the correct function to use.
-
User Intent: Consider the various ways users might express their requests related to the functions your chatbot can perform. The prompt should guide the LLM to recognize these intents and match them with the appropriate custom functions based on their descriptions.
-
Function Descriptions: Ensure that the descriptions of your custom functions are detailed and aligned with the types of tasks you mention in your chatbot's prompt. This alignment helps the LLM to accurately map user requests to the correct functions.
Example of an Effective Prompt
Instead of specifying a function name like getCalendarFreeBusySpots, you could
craft a prompt that outlines the chatbot's general capabilities, such as:
- Prompt Example: "Assist users in finding available times for appointments. When a user inquires about scheduling a meeting, provide them with options based on current availability."
This type of prompt relies on the LLM's understanding of the chatbot's task -
helping users book appointments - and its ability to parse user inquiries
related to this task. The LLM then uses the descriptions of the custom functions
to determine that the getCalendarFreeBusySpots function should be invoked to
fulfill this request, without the function name ever being directly mentioned.
Finalizing Integration
With the technical setup complete and a strategically crafted prompt in place, your chatbot is now equipped to intelligently and autonomously decide when to invoke the custom functions, enhancing the user experience by making interactions more dynamic, relevant, and efficient. This approach ensures that the chatbot's conversations remain natural and intuitive while still leveraging the advanced capabilities provided by the custom functions.
By focusing on the synergy between conversational design and the technical capabilities of your chatbot, you create a powerful and effective tool that meets the needs of your users in a seamless and engaging manner.